Documentation
In the package, you have :
- This manual
- The theme
- The demo install to reproduce exactly the demo site
Installation
- You can install only the theme in your Wordpress site. Go to "Appearance --> Themes" and click on "Add new". Select the the zip theme include in the package.
Active your new theme and click on "Customize". In the options, go to the section "Navigation" and choose your menu for the position "main menu". Then, click on "Save & publish" to finish the installation. - Or you can install a new Wordpress site with all the demo content inside.
Unzip the file "demo-install.zip". Upload all the files in the root of your domain. Then, enter your url in your browser to install Wordpress.
Important : In the first step of the installation, you must keep the Table prefix "wp_" . And after the installation you must use the username and password "admin" to enter in your admin. Of course, I recommend you to change that after.
After the installation, the options of the template are perhaps not loaded and your main menu isn't displayed correctly. Don't wory. Go to "Appearance --> Customize". Click on "Navigation" and choose the menu "main menu" for the location "main menu". Save the settings. Now your website is like the demo.
Theme options
You can customize the theme in the Wordpress main menu : "Appearance --> Customize"
Typography
You can find a lot of possibilities to create a beautiful website. I explain all that in the demo :
- Click here to see the General typography : titles, alignment, drop cap, inset, background color, image, ...
- Click here to see the column layouts.
- Click here to see the ordered and unordered lists.
- Click here to see the Font Awesome.
Font Awesome allows you to add vector icons from a library of over 360 to any part of your joomla template including Articles, Article titles, Menu items and Module titles. - Click here to see the tables.
- Click here to see the testimonials.
Widget Positions
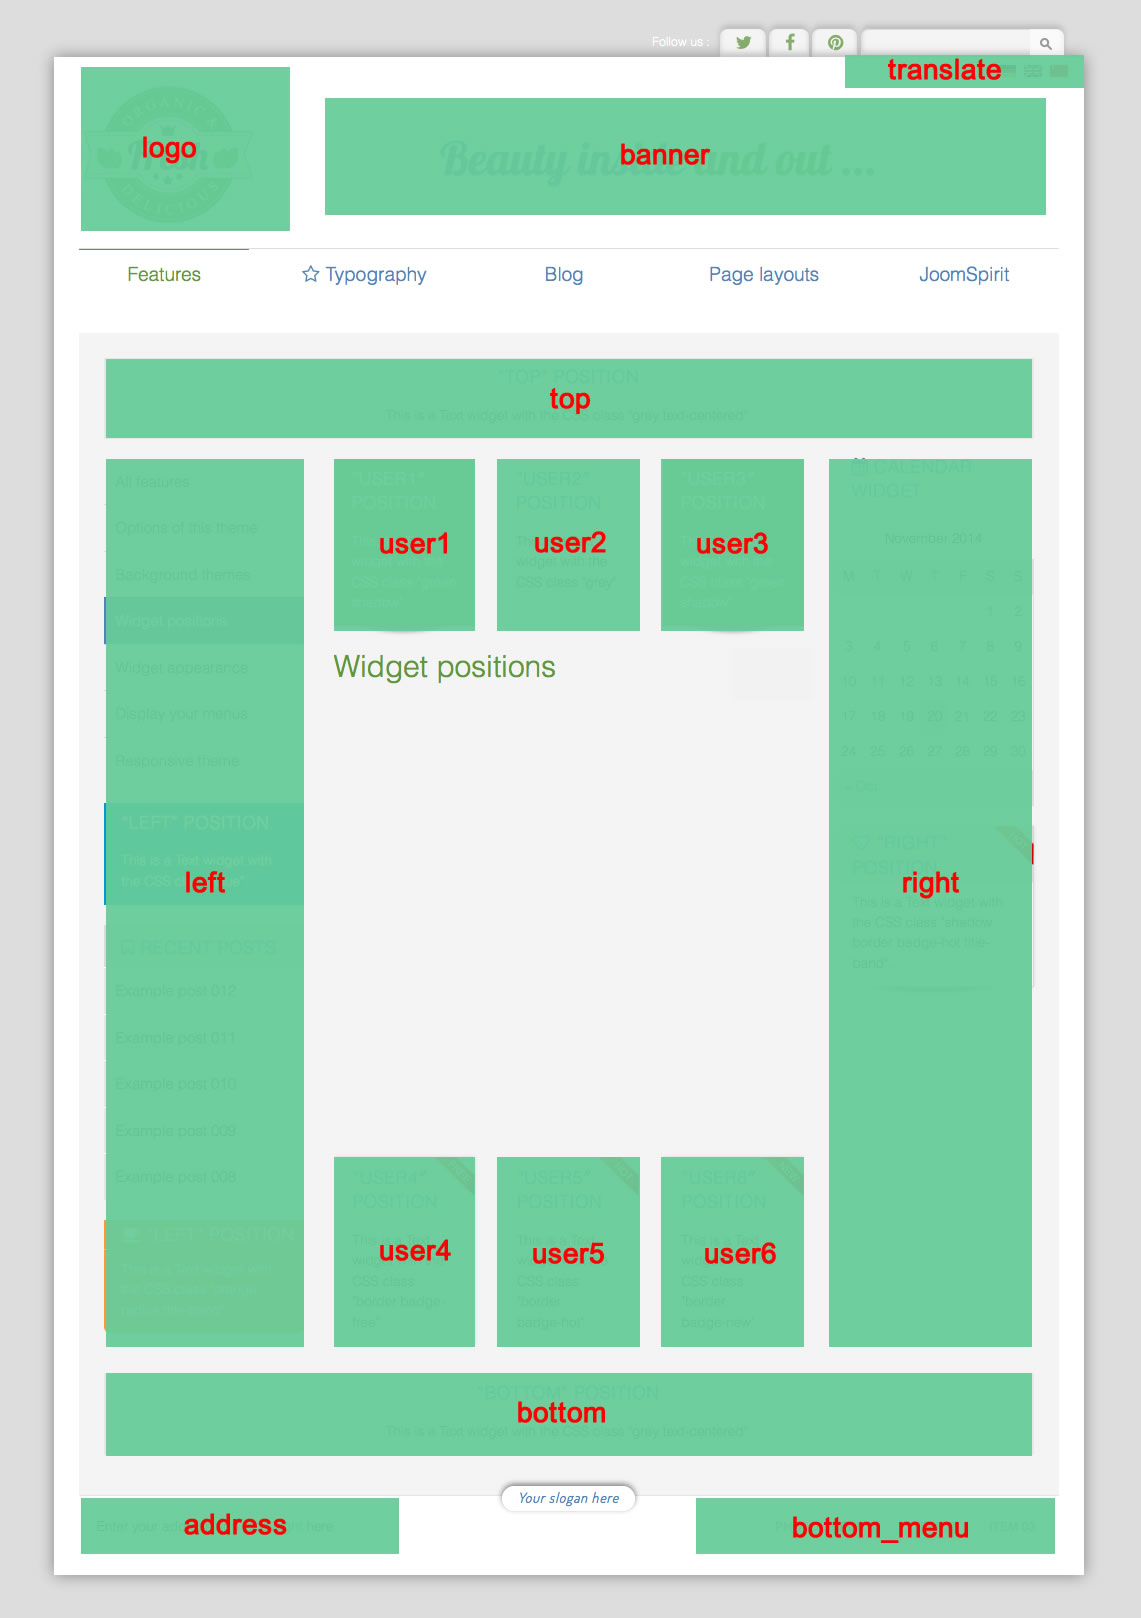
Example for the "address" position : go to the Widget manager. Insert a "Text" widget in the position "address". Write your address or/and copyright and save the widget.
How to display your logo ?
The logo is displayed on the left side. With this theme, you have 3 ways to display your logo / site name :
- To change the site name, go to the Theme customizer in the section "Logo or Website title". Modify the site name.
- Or you can display an image. In the same section, upload your image with the first option "Your logo image". If you make that, only the image will be displayed (not the website title). The size of your logo is free.
- Or you can put a widget in the position "logo". This widget will be a priority.
How to display the banner on the right side of the logo ?
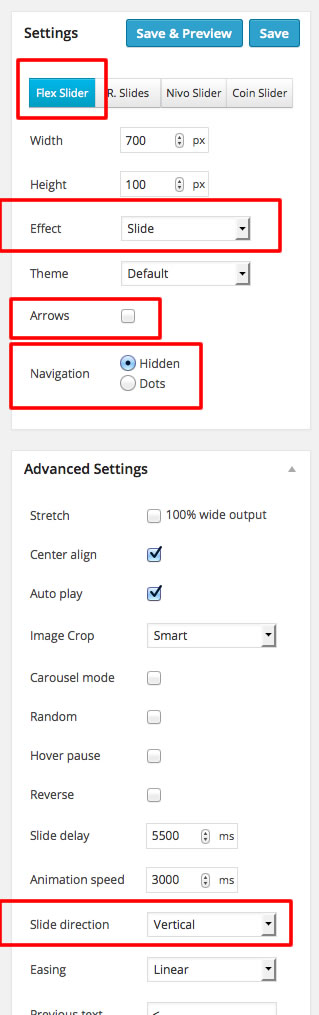
To obtain that, I displayed 3 images in a slideshow. I use the free slideshow plugin "Meta slider" (link here) with the Widget position "Banner"
In Theme customizer, you have a section "Banner" with 2 options to adjust the position of your widget. In the demo, the widget is align on the left side and with a margin top of 30 pixels.
These are the settings of the demo slideshow for the banner :
How to display your slogan ?
The slogan is displayed above the footer.
You can write directly the slogan in the Theme customizer, section "Slogan"
How to configure your menus ?
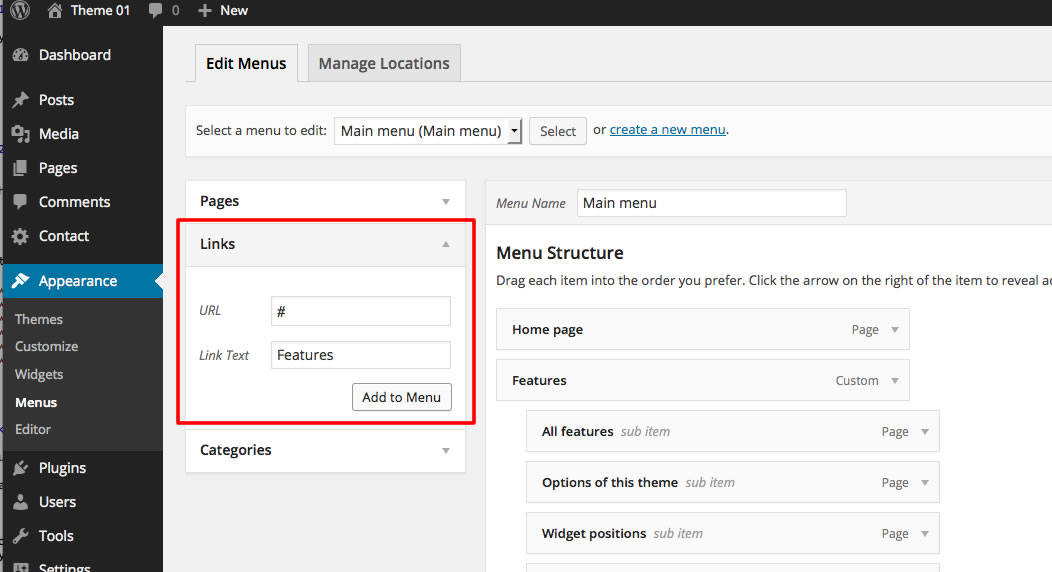
The dropdown menu (main menu):
Note for mobile devices : I recommend you to choose the type "Link" for all your parent items and put the character # in the url field. The result is a fake link. It's better for the compatibility with tactil browsers and the navigation is more simple for your visitors.
Bottom menu
To use it, you must create a new menu in "Appearance --> Menus". Then, go to the Widget manager and create a Widget "Menu" in the position "bottom menu".
Note : you can use only 1 level of links with this menu.
Additionnal horizontal and vertical menu
If you want display a second menu in the content part, you have a lot of possibilities.
To use it, you must create a new menu in "Appearance --> Menus". Then, go to the Widget manager and create a Widget "Menu" in the position "left", "right", "top", "bottom" or "userX" and add the CSS class of your choice.
Click here to read all the details in the demo page with some examples.
Note : All these menus work without javascript code (pure CSS : no risk of conflict with another extension !).
Widget appearance :
How to change the appearance of each widget ?
With this theme, you can add a CSS class for each widget. It's a useful option to customize your widgets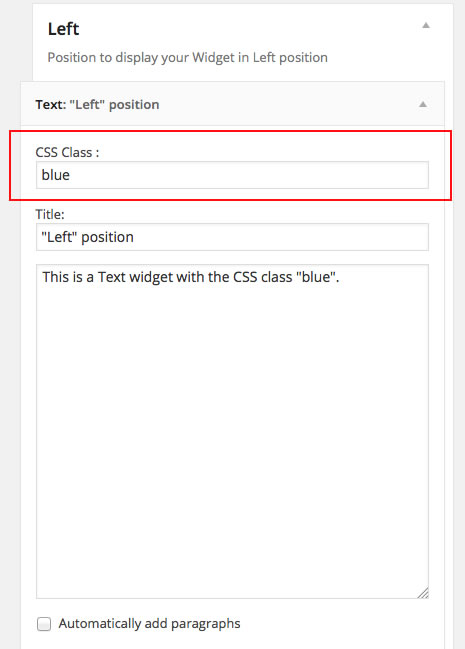
Options for displaying your widgets in the "left", "right", "top", "bottom" or "user" positions :
- Without CSS class : No styling for your list and the links.
- With the CSS class " horizontal-menu" or "vertical-menu" : to display an additionnal menu.
- With the CSS class " border" : you add a border around your module.
- With the CSS class " radius" : you add a rounded corner.
- With the CSS class " shadow" : you add a shadow under the module
- With the CSS class "white" : you add a white background
- With the CSS class "black" : you add a black background
- With the CSS class "grey" : you add a grey background
- With the CSS class "orange" : you add an orange background
- With the CSS class "violet" : you add an violet background
- With the CSS class "red" : you add a red background
- With the CSS class "blue" : you add a blue background
- With the CSS class "green" : you add a green background
- With the CSS class "turquoise" : you add a turquoise background
- With the CSS class "brown" : you add a brown background
- With the CSS class "text-centered" : the widget title and all the text are centered
- With the CSS class "title-band" : display a dark background under the module title (you can't put "title-centered" in the same module)
- With the CSS class "badge-new", "badge-free", "badge-hot", "badge-top", "badge-news", "badge-gift" : to display a badge in the upper right corner of your widget.
- With the CSS class ” no-margin” : it’s a useful option to remove the margin around a widget position . That work for “left”, “right” and “user” positions.
- With the CSS class ” no-margin-slide” : it’s a special CSS class suffix only for the position “top” and “bottom”. If you display a slideshow or an image in these positions, add this CSS class to remove the empty space on each side.
Note : If you choose a background color , the color of the widget title is always white. Note : You can enter several CSS class. Example "shadow green badge-top text-centered" . Each CSS class is separate by a space.
Extra CSS class for mobiles
For faster mobile-friendly development, use these utility classes for showing and hiding content by device. More details here
How to display the main slideshow like the Home page demo ?
I use the free slideshow plugin "Meta slider" (link here) with the Widget position "Top".
To remove the space in each side of the slideshow, you must add the CSS class "no-margin-slide"
Useful plugins
In this demo, I use 5 free extensions :
- Display widgets : probably the most important. With this extension, you can show / hide a widget only on a few pages.
- Meta slider to display the slideshow
- Responsive Lightbox to added a lightbox effect
- Contact form 7 to create the contact form in Contact page
- Regenerate thumbnails : useful if you change the size of your thumbnails.
You can find more info and the download links of these plugins here.
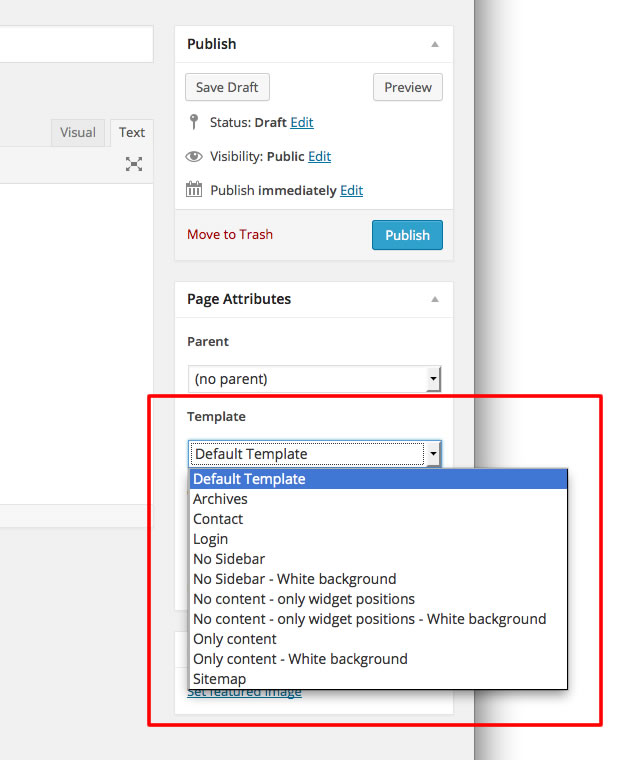
Special pages include in this theme
There is a lot of extra templates pages available :
- Archives : example in the demo
- Contact : example in the demo
- Login : example in the demo
- No sidebar
- No sidebar - White background
- No content - only widget positions
- No content - only widget positions - White background : I use it for the Home page demo.
- No tile
- No title - White background
- Only content
- Only content - White background
- Sitemap : example in the demo
How to obtain the Home page of the demo ?
- I display the slideshow widget metal slider in the Widget position "top" with the CSS class "no-margin-slide"
- I create a new Page. I choose the Template page "No content - only widget positions - White background" and I publish this page with the title "home page".
- In theme customizer, section "Static Front page", I choose "static page" and I select the page "home page"
- And I publish 3 Text widgets with the position "user1", "user2" and "user"3. For each of them, I added the CSS class "title-centered"
The contact page
You can see an example here
It's simple to obtain that :
- In theme customizer, click on the section "Contact Page"
- In the first option, enter the shortcode of your contact form
- Select the position of your contact form
- and add the code of your Google map if you want display a map (see details after)
- save your settings and go to the Page manager
- create a new page with the template "Contact"
- You can write some text to display your contact info. This is a screenshot of the demo :
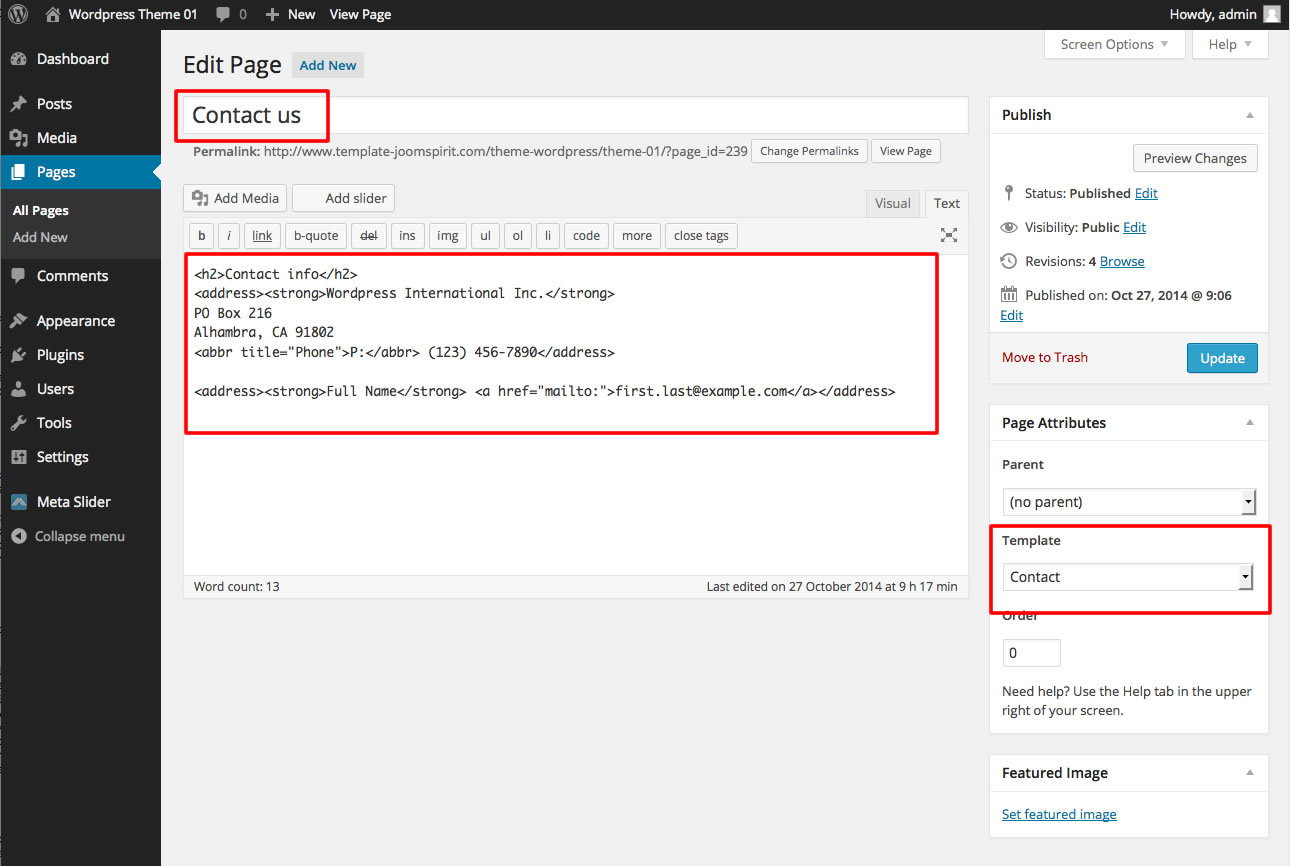
- It's all
How to obtain the Shortcode of my contact form ?
You must install the plugin of your choice
In the demo, I use the plugin "Contact form 7". You can find more info and the download link here.
How to obtain the code of my Google map ?
- Go to the Google maps
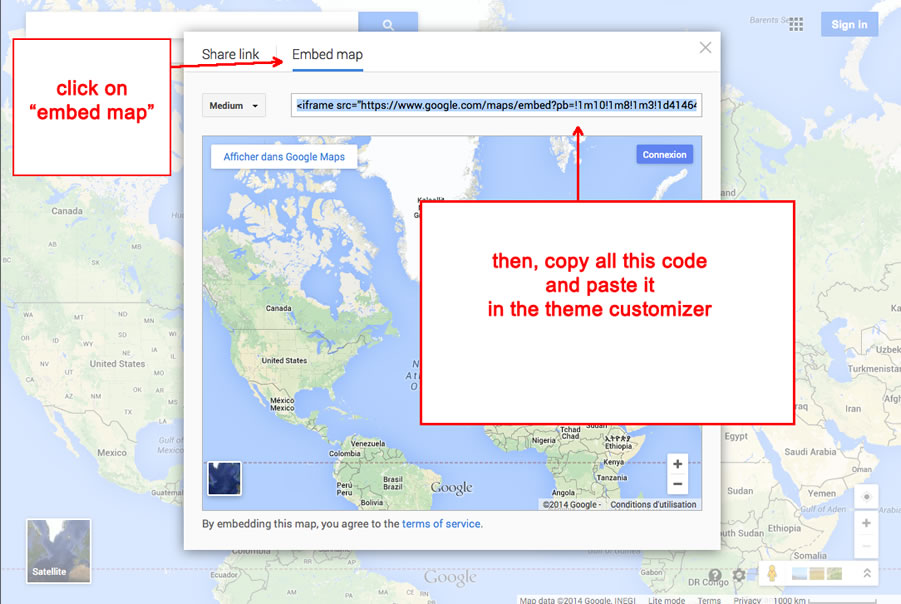
- Choose your location and click on the "parameters" icon :
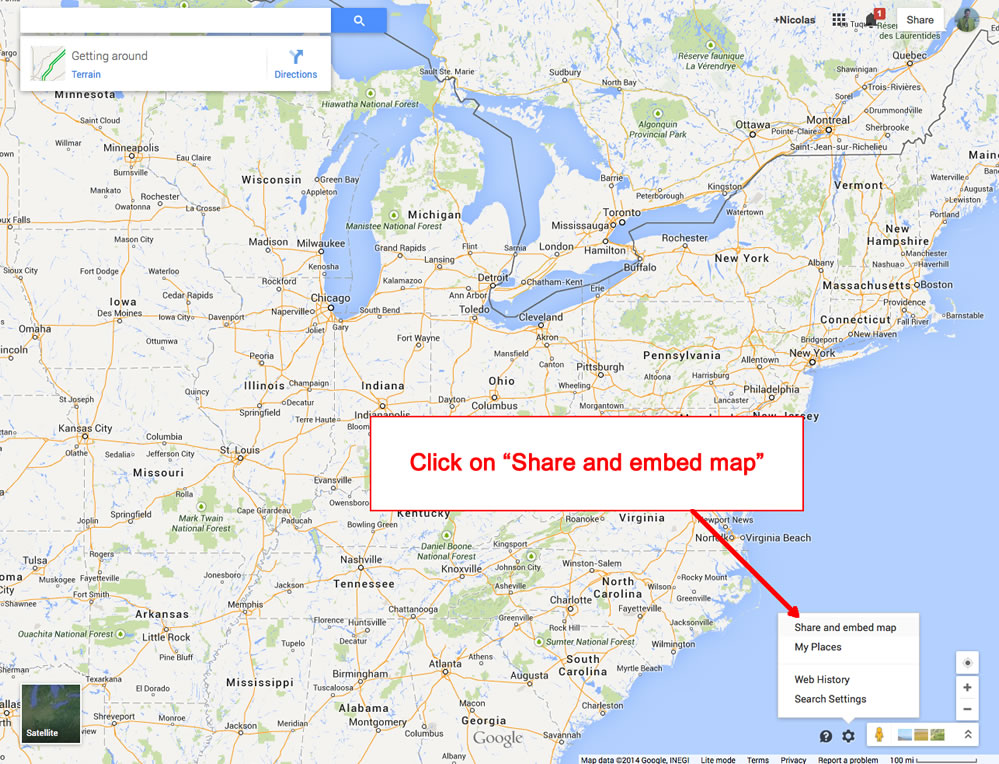
- In the new window, copy the full code and paste it in the Theme customizer of your Wordpress site
note : you must create a google account to add a marker
Tips for the width of user modules
Between each user positions, there's a space of 5%. In Theme customizer, you can adjust the width of user1 and user3 in percentage (section "Width"). The width of user2 automatically adjusts.
By default, the width is 30% for "user1" and "user3". So if you use "user1", "user2" and "user3", the width of "user2" is 100% - 30% -5% - 30% -5% = 30%
If you use only one user position, use the position "user2" (for a width of 100%).
If you use two users positions, use "user1" and "user2", or "user2" and "user3".
It's the same thing for "user4", "user5" and "user6"
Tips for the number of columns of your Posts
In the section "General" of Theme customizer, you can set the number of columns to display your Posts. But perhaps would you change your choice for one category of Posts.
It's possible but only for a single category : add the name or the slug of your category in the next option.
How to add a new Google font in Theme customizer ?
- Go to the Google font page. Choose your font and click on the button "quick use"
- Paste the code below and copy it in Template manager.
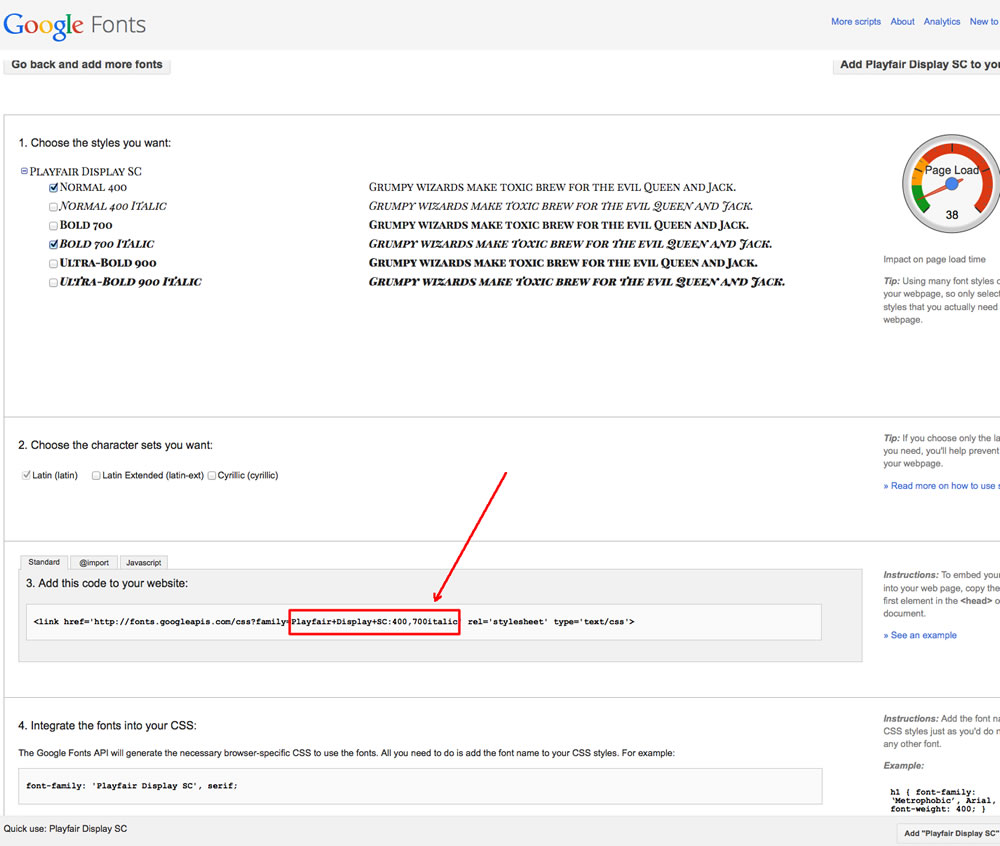
In this example the code is : Playfair+Display+SC:400,700italic
How to add an icon before a menu item, before a title or in your content ?
Click here to see the details of Font Awesome.
Font Awesome allows you to add vector icons from a library of over 360 to any part of your theme including Pages, Posts, Menu items and Widget titles.
Tips for your images
By default, a border is added around all your images in your articles. You can disable this option in the section "General" of Theme customizer.
If you want add this border only on specific images, disable this option and add the class "js-border" in the HTML code of your image.
If you want remove this border only on specific images, enable this option and add the class "no-style" in the HTML code of your image.
SEO in this theme
I use a function of Twentytwelve theme to customize the page title.
For the Home page, the page title is your site name with the description after. You can change that in "Settings --> general"
In others url, the page title is the title of your content and your site name after
If you want you can modify or delete this function. It's line 100 of "functions.php" : Filter the page title
Multilingual
The frontend of this theme is already translated in 10 languages : english, german, spanish, portuguese, french, arabic, chinese, italian, russian and japanese.
The backend isn't translate because it's too long and complex.
All the languages files are in the folder "languages" of this theme.
Customize the template
I recommmend you to create a child theme. You can easily find a tutorial to learn how to make that in few minutes.
Link
This theme is free to promote my work. I decided to include a Copyright in the bottom of the theme to increase awareness of the site JoomSpirit.
This does not affect your site, but if you want remove this link, thank you to donate 10 euros on donation page here and contact me at: contact@joomspirit.com to obtain a clean version.